Composting is the controlled breakdown of food scraps and garden waste into dark, crumbly soil improver. The core rule is simple: mix nitrogen-rich "greens" with carbon-rich "browns", keep the pile damp like a wrung-out sponge, and give it air. These composting basics will get a first pile going.
Greens and browns explained
Greens are fresh, wet and nitrogen-rich: vegetable peelings, fruit scraps, coffee grounds and fresh grass clippings. Browns are dry and carbon-rich: dead leaves, shredded cardboard, straw and torn paper.
A frequently quoted starting point is about two to three parts browns to one part greens by volume. It is a guide, not a law. If the pile is wet and smelly, add browns. If it is dry and nothing is happening, add greens and water.
What to add and what to leave out
| Usually fine | Best left out of a home pile |
|---|---|
| Fruit and vegetable scraps | Meat, fish and bones |
| Coffee grounds and paper filters | Dairy and greasy leftovers |
| Eggshells (crushed) | Pet waste |
| Dry leaves and straw | Diseased plants |
| Plain cardboard, shredded | Weeds that have gone to seed |
Meat, dairy and oils tend to attract rodents and flies and can smell as they break down. Pet waste can carry organisms you do not want near edible plants. When in doubt, leave it out.
Choose a bin or build a heap
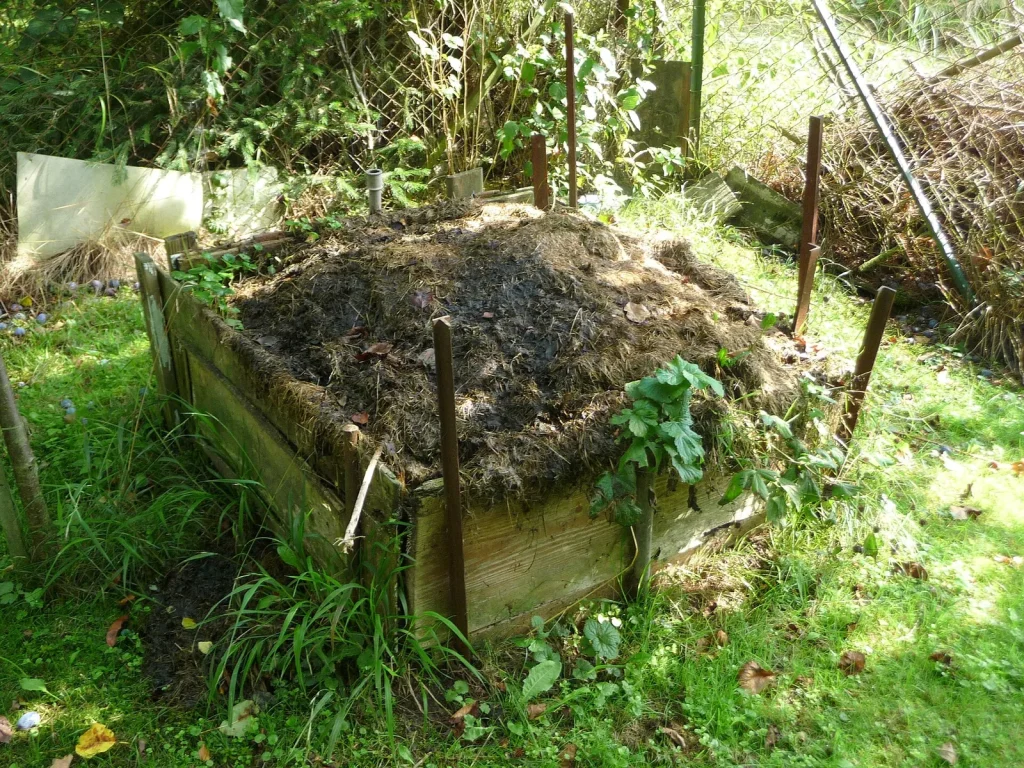
An open heap is the cheapest option and works fine in a quiet corner. A closed bin tidies things up and deters animals. A tumbler is easy to turn, though it holds less. In a flat or small yard, a countertop caddy for scraps paired with a municipal food-waste collection or community scheme may suit you better.
Check your local rules, since some areas have guidance about bin placement or food-waste collection. Place the pile on bare soil, if possible, so worms and microbes can move in.
Build the pile step by step
- Start with a few inches of coarse twigs or straw for airflow.
- Add alternating layers of browns and greens, a few inches each.
- Chop or tear large pieces; smaller bits break down faster.
- Moisten dry layers until they feel damp but do not drip.
- Cover the top with a layer of browns to keep smells and flies down.
Burying fresh kitchen scraps in the middle of the heap, rather than leaving them on top, also helps.
Keep your composting basics on track
Turn the pile every week or two with a fork to bring in oxygen. A turned, well-balanced pile can be finished in a few months, while a neglected one may take a year or more. Both are fine; you are only choosing your pace.
Troubleshooting is mostly a matter of balance.
- Smells like ammonia or rot: too many greens or too wet. Add browns and turn.
- Dry and slow: add water and some greens.
- Flies around the bin: bury scraps and cover with browns.
- Pests visiting: check for meat or dairy and use a closed bin.
Using finished compost
Finished compost is dark, crumbly and smells like forest soil, with few recognisable scraps. Dig it into beds before planting, spread a thin layer around established plants, or mix a small amount into potting soil. It is a natural fit when you start a vegetable garden, and autumn is a good time to top-dress beds, which belongs on any seasonal home maintenance checklist.
Collecting scraps also changes how a kitchen runs. A small lidded bin near the chopping board works well, and it fits neatly into a plan to organize a small kitchen. For more practical guides, browse the Home & Garden category.
A few extra habits
Keep a small container of dry leaves or shredded paper beside the bin so you can cover each new scrap addition at once. In winter the pile slows down, and that is fine; keep adding material and it will pick up again when the weather warms. Chop woody stems before adding them, since big pieces can linger for months. Finally, keep a simple note of what went in and when. It helps you spot patterns, such as a wet week followed by a smelly pile, and teaches you quickly how your own bin behaves. Every household’s mix of food, garden waste and climate is a little different, so treat the first season as practice and adjust by smell, texture and moisture rather than by any exact formula.
Key takeaways
- Balance wet greens with dry browns, roughly two to three parts brown to one part green.
- Keep the pile as damp as a wrung-out sponge and turn it now and then.
- Avoid meat, dairy, oils and pet waste in a home pile.
- Most problems are fixed by adjusting moisture or the greens-to-browns balance.
Frequently asked questions
How long does compost take to be ready?
Anywhere from a couple of months to a year or more. Smaller pieces, regular turning and a good balance of materials speed things up.
Will a compost pile smell?
A healthy pile smells earthy. Bad smells usually mean it is too wet or has too many greens, which more browns and turning usually fix.
Can I compost in an apartment?
Yes, with a small worm bin or a sealed countertop system, or by using a local food-scrap collection service where one exists.
Do I need to add worms or activators?
Not for an outdoor pile. Microbes and insects find it on their own, and a spadeful of finished compost can help if you want to give it a nudge.
Photo: Compost bin (2) by I would appreciate being notified if you use my work outside Wikimedia. Do not copy this i, CC BY-SA 3.0, via Wikimedia Commons